
3 posts tagged with "KubeArmor"

View All Tags

· 6 min read
Atharva Shah

We're excited to announce a powerful new security capability in KubeArmor: USB Device Audit and Enforcement, now available in KubeArmor Host Policies. This feature, introduced in PR #2194 and tracking Issue #2165, significantly extends KubeArmor's runtime security scope, moving beyond processes, files, and networks to secure the physical hardware layer of your nodes and VMs.

Want to see it in action? Check out this demo video:

How USBs are a Physical Attack Vector

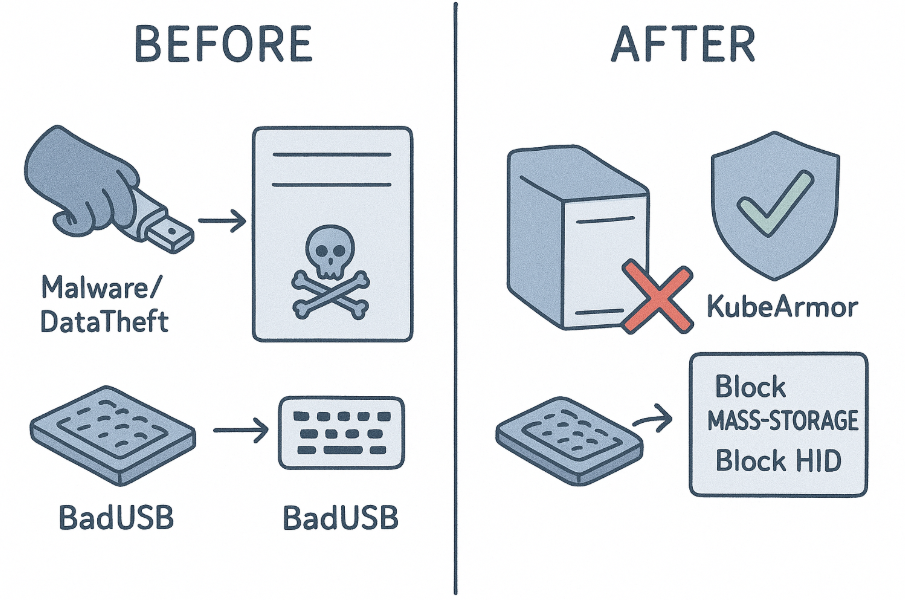
In any secure environment, physical access is a critical threat vector. USB devices, while ubiquitous, introduce substantial risks:

  • Data Exfiltration: Unauthorized USB mass storage devices can be used to easily copy and steal sensitive data.
  • Malicious Peripherals: Devices posing as keyboards (like "BadUSBs") can execute key-logging attacks or inject malicious commands.
  • Firmware-Based Attacks: Sophisticated attacks can target the device firmware itself.

Controlling which devices can be attached to a host is a critical part of a defense-in-depth strategy and a common requirement for regulatory compliance.

The Solution - The KubeArmor USB Device Handler

The new USB Device Handler gives you granular, policy-based control over USB devices at the host level. You can now create KubeArmor Host Policies to audit (log) or block (deauthorize) specific devices or entire classes of devices based on their attributes.

alt text

How It Works Under the Hood

To provide robust, low-level control, the USB Device Handler operates by directly interacting with the Linux kernel:

  1. Monitoring Kernel U-events: The handler listens to kernel U-events via a Netlink socket. The kernel emits these events whenever a USB device is attached or removed.
  2. Device Enumeration: When a device is attached, the kernel enumerates it, reading its descriptors to identify its class, subClass, protocol, and other attributes. This information is included in the U-event.
  3. Policy Matching: The USB Device Handler receives this U-event and matches the device's attributes against all applied KubeArmorHostPolicy resources.
  4. sysfs Enforcement: Based on the policy's action (Audit or Block), the handler enforces control using sysfs-based authorization.
    • It writes a 1 (authorize) or 0 (deauthorize) to the device's authorized file within the sysfs pseudo-file system (e.g., /sys/bus/usb/devices/.../authorized).
    • Writing 0 instantly deauthorizes the device, unbinding its drivers and making it unusable by the system, effectively blocking it.

This mechanism ensures that even if a device is physically plugged in, it cannot be accessed or used by the host operating system if a "Block" policy is in place.

Configuration and Setting Up the USB Device Handler

To enable this feature, you need to update your KubeArmor configuration.

  1. Enable the Handler: You must set two flags to true:

    • enableKubeArmorHostPolicy: true
    • enableUSBDeviceHandler: true

    If you are running KubeArmor in Kubernetes, you will need to patch the DaemonSet. For systemd (non-Kubernetes) mode, you will add these flags to your configuration file.

  2. Set the Default Posture: A new flag, hostDefaultDevicePosture, is also available. This flag (which defaults to audit) determines the action KubeArmor will take on devices that do not match any policy when running in allow-list mode (when there is at least one allow-based policy applied).

    • audit (Default): Unmatched devices are audited.
    • block: Unmatched devices are automatically blocked.

Monitoring Device Events

You can easily monitor USB device alerts and logs using the karmor CLI:

# Listen for device-specific operations (both logs and alerts)
karmor log --operation device --log-filter all

alt text

Policy in Action - Use Cases

A new device block is now available in the KubeArmorHostPolicy spec. You can match devices based on class, subClass, protocol, and level (attachment level).

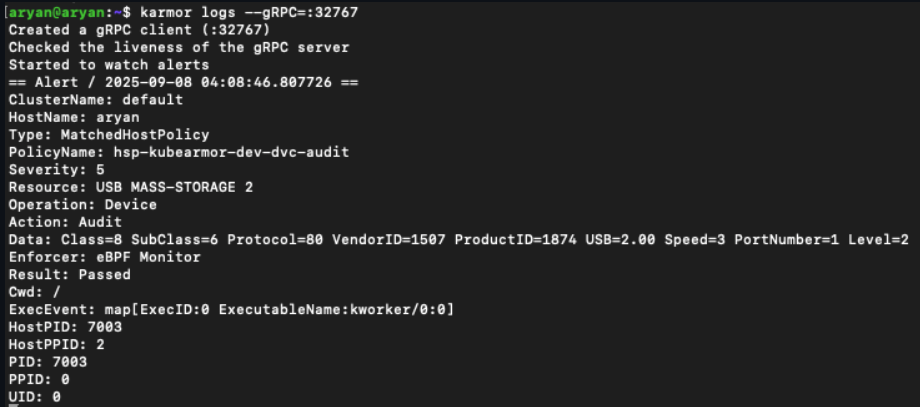
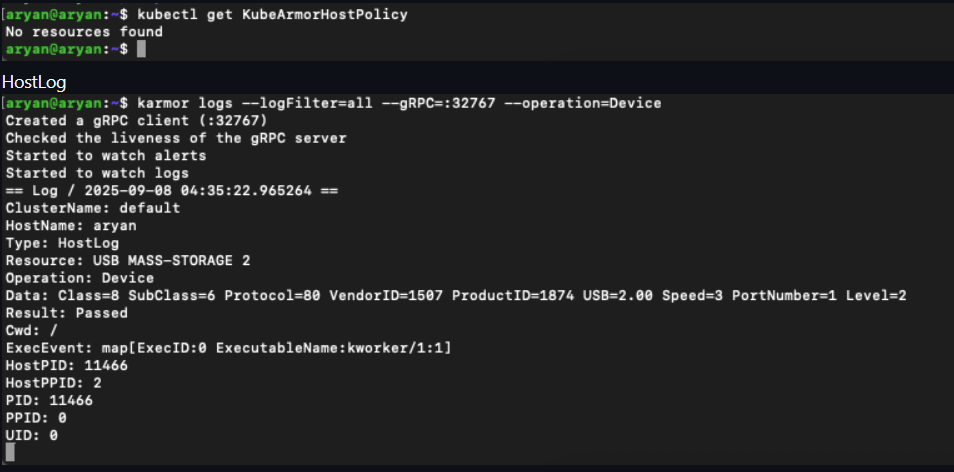
Example 1: Audit All Mass Storage Devices

This policy creates an Audit alert every time a USB mass storage device is attached. This is perfect for gaining visibility and meeting compliance requirements without being disruptive.

apiVersion: security.kubearmor.com/v1
kind: KubeArmorHostPolicy
metadata:
name: hsp-device-mass-storage-audit
spec:
nodeSelector:
matchLabels:
kubernetes.io/hostname: your-node-name # Target a specific node
severity: 5
device:
matchDevice:
# Class can be a string (e.g., "MASS-STORAGE")
# or its numeric ID (e.g., 8)
- class: MASS-STORAGE
action: Audit # Logs the event

Example 2: Block All Mass Storage Devices

To prevent data exfiltration, you can simply change the action to Block.

apiVersion: security.kubearmor.com/v1
kind: KubeArmorHostPolicy
metadata:
name: hsp-device-mass-storage-block
spec:
nodeSelector:
matchLabels:
kubernetes.io/hostname: your-node-name
severity: 8 # Higher severity for a block
device:
matchDevice:
- class: MASS-STORAGE
action: Block # Blocks the device

Example 3: Block Specific Malicious-Type Devices (e.g., Keyboards)

This policy demonstrates how to use more granular fields to block devices that identify as a keyboard (a common vector for BadUSB attacks).

apiVersion: security.kubearmor.com/v1
kind: KubeArmorHostPolicy
metadata:
name: hsp-device-hid-keyboard-block
spec:
nodeSelector:
matchLabels:
kubernetes.io/hostname: your-node-name
severity: 10
device:
matchDevice:
- class: HID # Human Interface Device
subClass: 1 # Boot Interface Sub-class
protocol: 1 # Keyboard
action: Block

Policy Specificity Matters

The USB Device Handler respects policy priority: the most specifically defined policy wins.

For example, if you have two policies:

  1. Block class: MASS-STORAGE
  2. Allow class: MASS-STORAGE, subClass: 6, protocol: 80

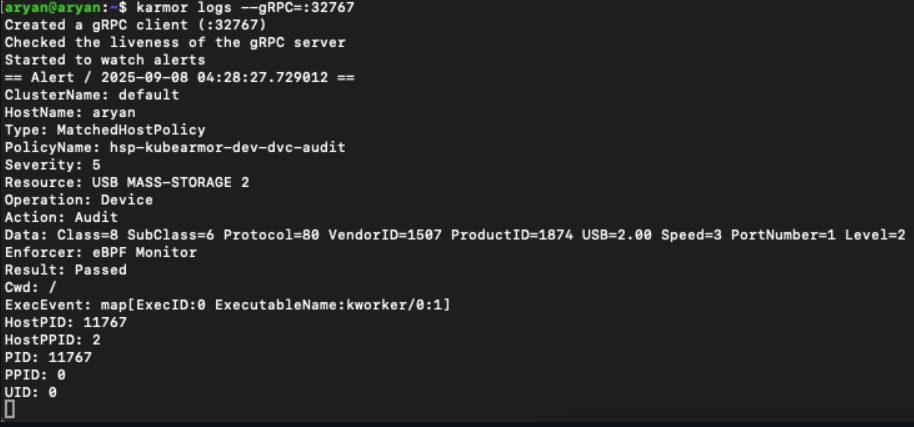
The handler will allow a device that matches the second, more specific policy (a mass storage device with subclass 6 and protocol 80), while still blocking all other mass storage devices. This allows you to create fine-grained allow-lists for specific, approved corporate devices.

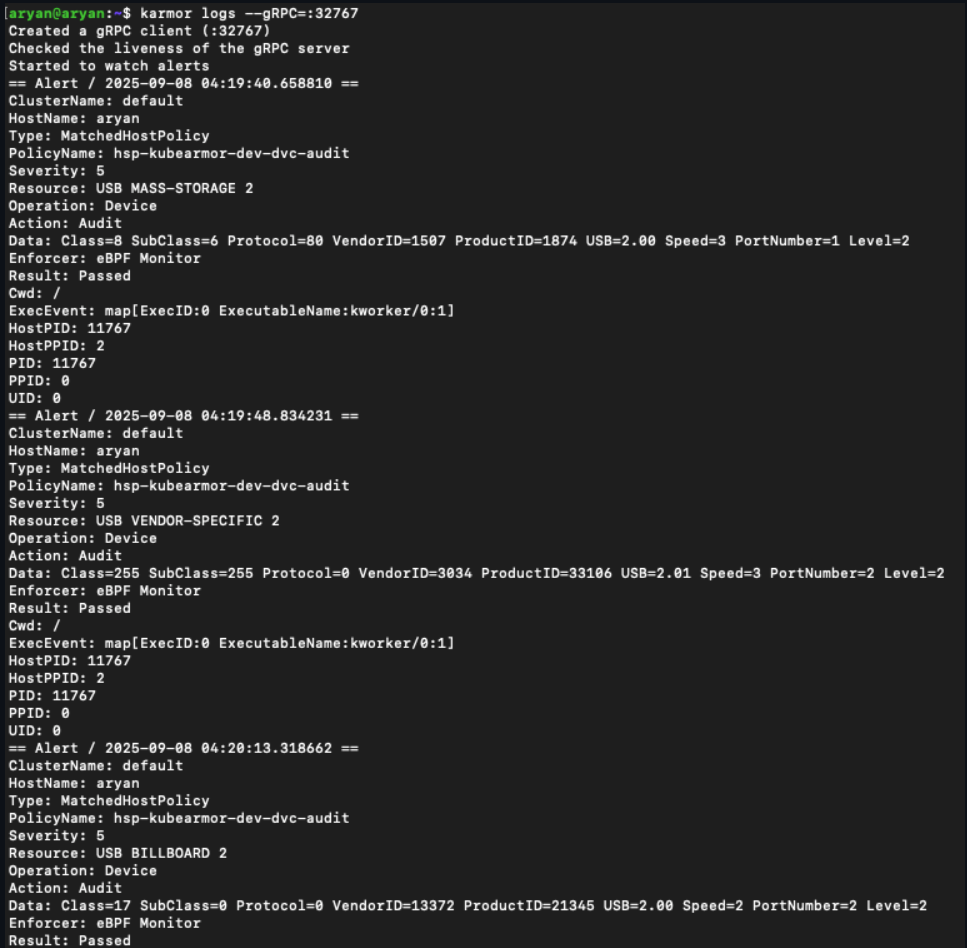
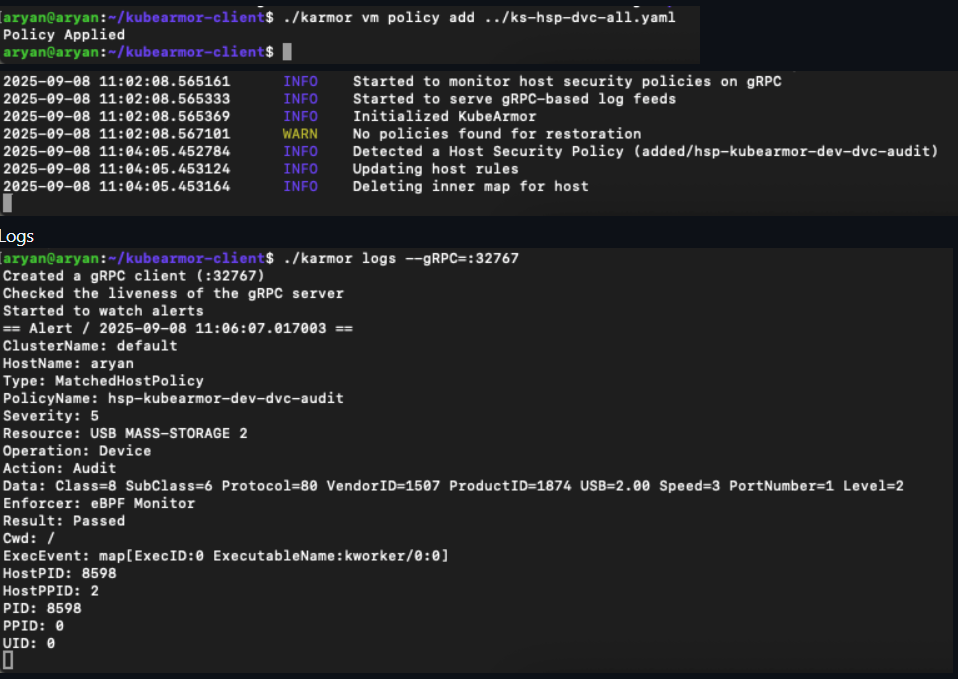
Policy In Action - Exact Match, Match All, Allow Based Examples

You can create policies using exact matches, match-all conditions, and allow-based approaches.

Exact Match Example - Audit a Specific USB Device:

apiVersion: security.kubearmor.com/v1
kind: KubeArmorHostPolicy
metadata:
name: hsp-kubearmor-dev-dvc-audit
spec:
nodeSelector:
matchLabels:
kubernetes.io/hostname: aryan
severity: 5
device:
matchDevice:
- class: MASS-STORAGE
action: Audit

Logs (after attaching a USB drive and 2 other USB devices): alt text

Match All Example - Block All USB Devices:

apiVersion: security.kubearmor.com/v1
kind: KubeArmorHostPolicy
metadata:
name: hsp-kubearmor-dev-dvc-audit
spec:
nodeSelector:
matchLabels:
kubernetes.io/hostname: aryan
severity: 5
device:
matchDevice:
- class: ALL
action: Audit

Logs (after attaching 3 different USB devices): alt text

Allow Based Example

apiVersion: security.kubearmor.com/v1
kind: KubeArmorHostPolicy
metadata:
name: hsp-kubearmor-dev-dvc-audit
spec:
nodeSelector:
matchLabels:
kubernetes.io/hostname: aryan
severity: 5
device:
matchDevice:
- class: ALL
action: Allow

alt text

When No Policy is Set:

alt text

For non-k8s mode:

apiVersion: security.kubearmor.com/v1
kind: KubeArmorHostPolicy
metadata:
name: hsp-kubearmor-dev-dvc-audit
spec:
nodeSelector:
matchLabels:
kubearmor.io/hostname: aryan
severity: 5
device:
matchDevice:
- class: ALL
action: Audit

alt text

Conclusion

The new USB Device Enforcement feature brings critical, hardware-level runtime security to your KubeArmor-protected hosts. You can now gain full visibility into device events, prevent unauthorized USB access, and build a more resilient security posture against physical threats.

A special thanks to AryanBakliwal for contributing this major feature.

· 6 min read
Rishabh Soni

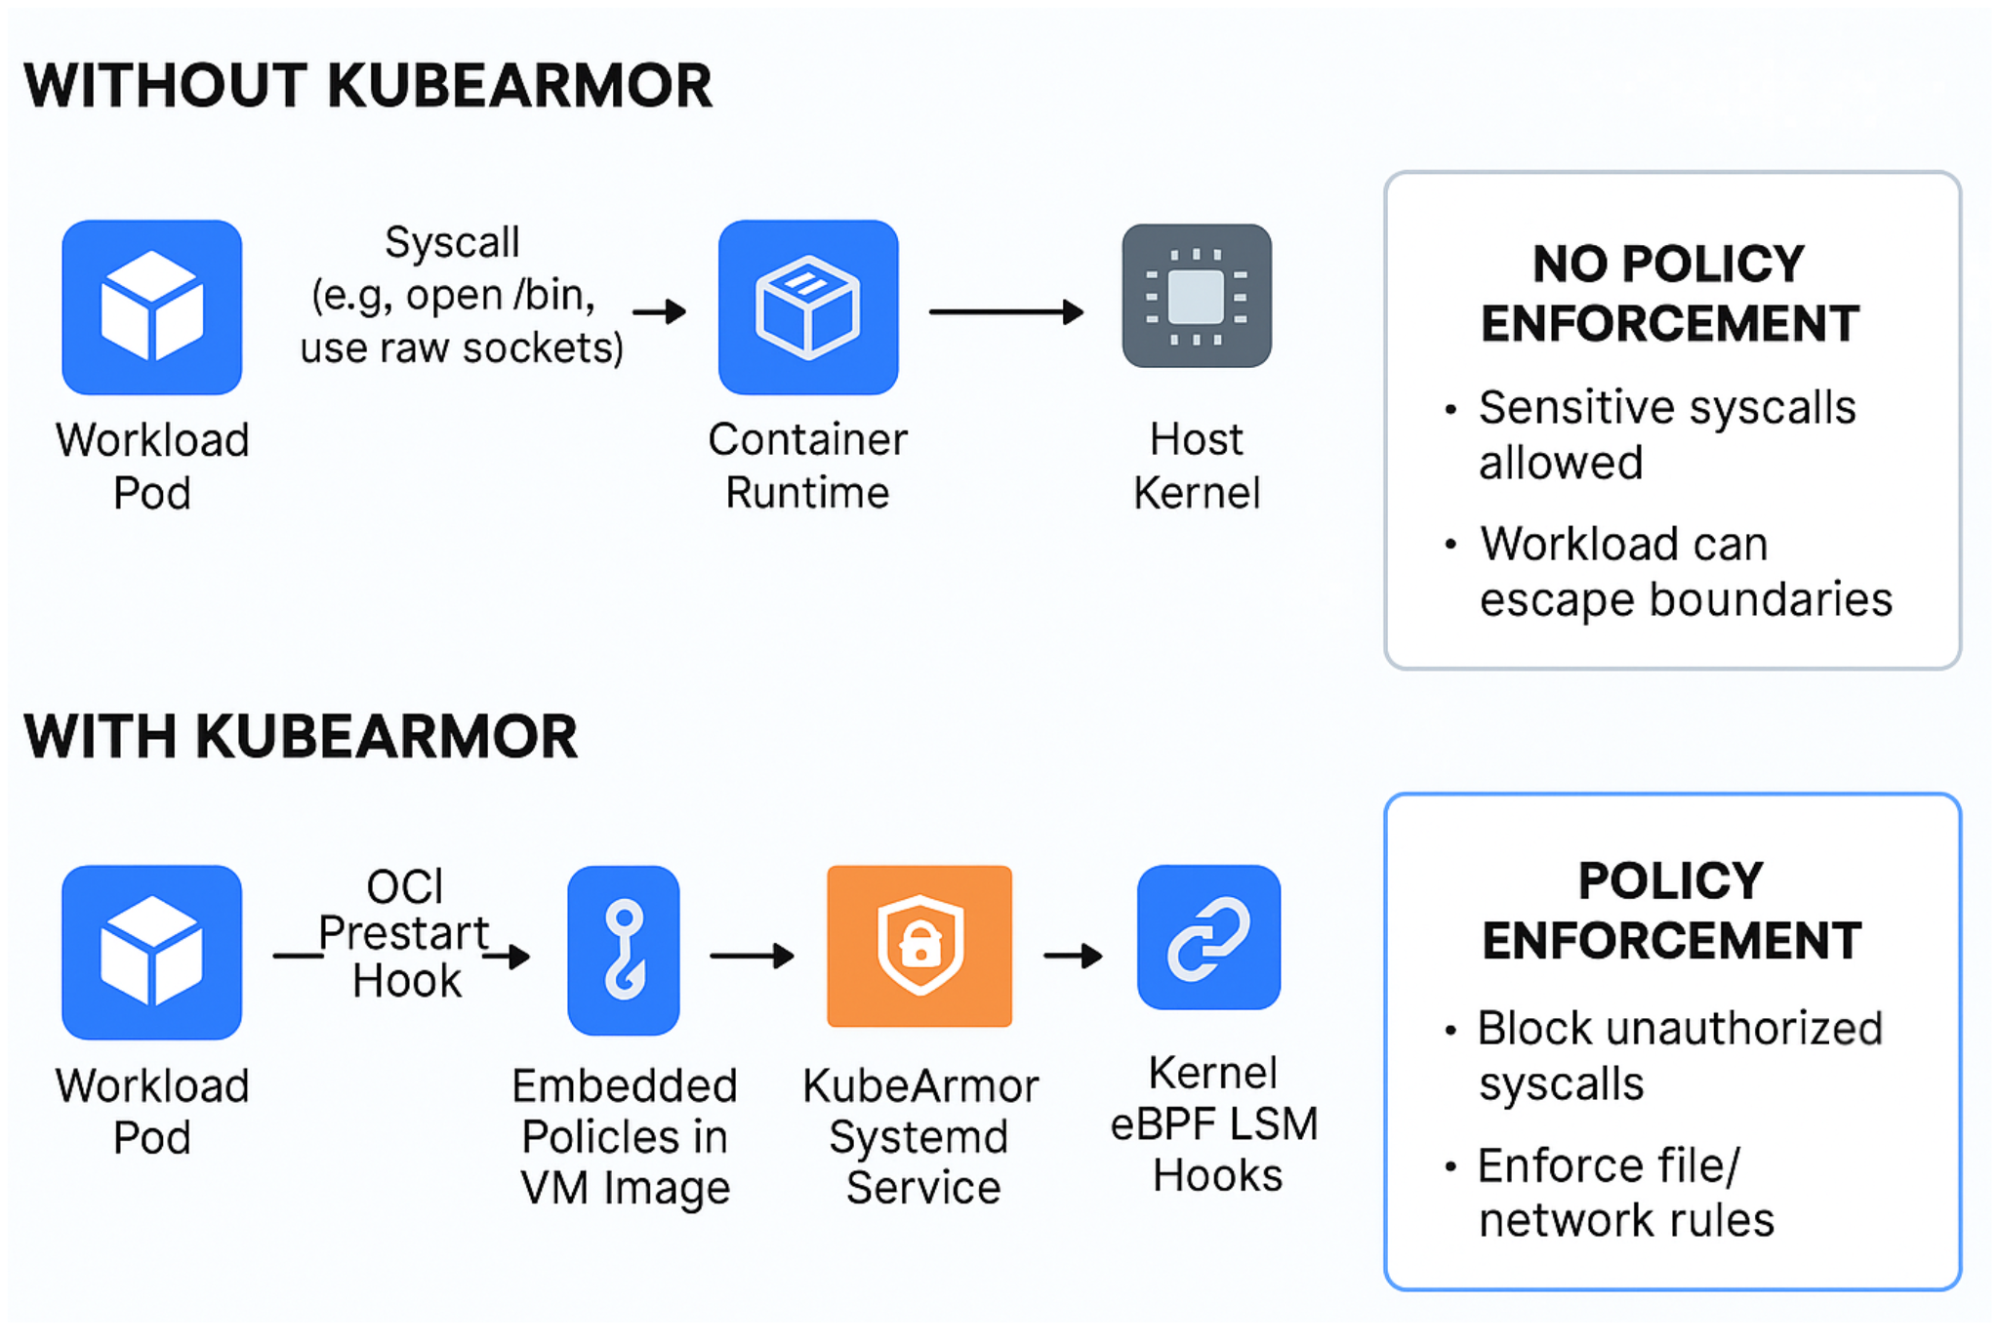
Enforcing security policies in a zero-trust environment presents a fundamental challenge: controls enforced on the host can be compromised or create unintended side effects for other workloads.

A more robust approach sandboxes the security enforcement mechanism within the workload runtime environment itself, ensuring policies are isolated and specific to the workload they protect.

The integration of KubeArmor’s eBPF-based security with Confidential Containers (CoCo) achieves this isolated enforcement model. It details the proof-of-concept (PoC) architecture, policy enforcement mechanisms, and key security considerations for creating a zero-trust solution for sensitive workloads.

Security Challenges in Confidential Environments

Vault Security

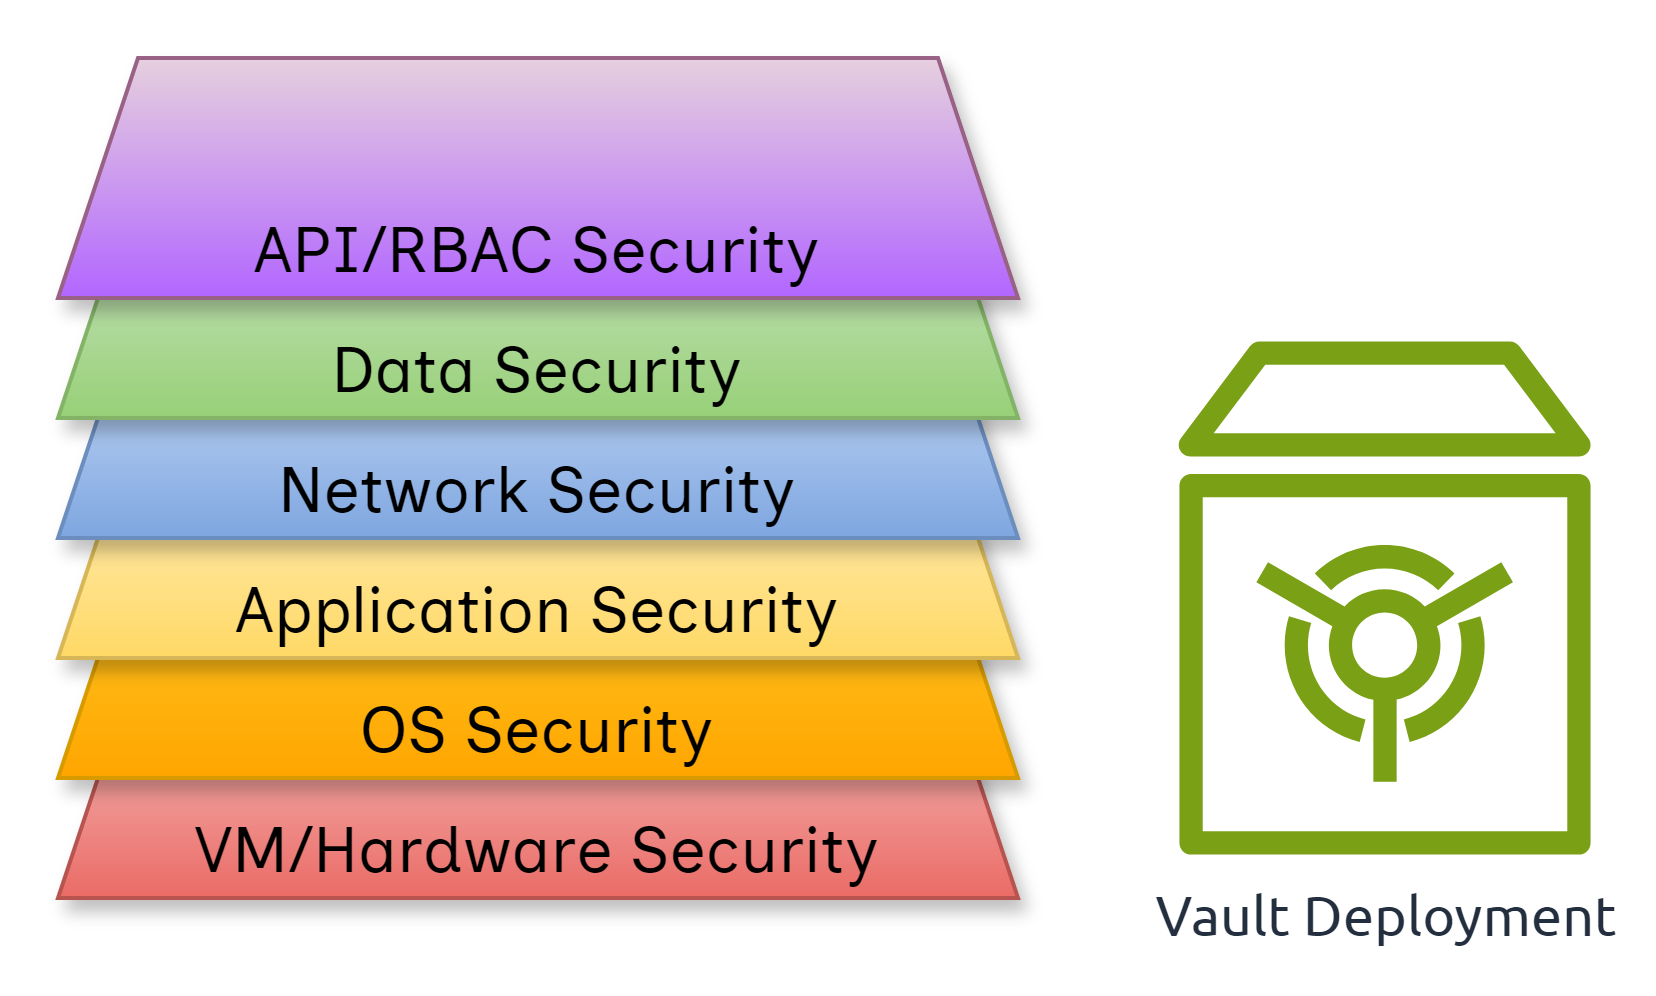
Securing secrets within a Kubernetes (K8s) environment is critical, and using a tool like HashiCorp Vault is a common best practice.

Vault stores highly sensitive data such as passwords, API tokens, access keys, and connection strings. A compromised vault can lead to severe consequences including ransomware attacks, organizational downtime, and reputational damage.

Key Threat Models and Risks

Threat ModelThreat Vector(s)Remediation
👤 User Access ThreatsAn attacker compromises a legitimate user’s endpoint or credentials to impersonate them and access the Vault.• Implement MFA • Enforce least privilege
🖥️ Server Threats• Lateral movement from another compromised service • Exploiting Vault vulnerability (e.g., RCE) to inspect memory or access secret volumes• Use network segmentation • Disallow kubectl exec on Vault pods • Apply runtime security
💻 Client-Side ThreatsAuthorized app retrieves a secret but stores it insecurely (e.g., plaintext, memory, disk, env var).• Ensure secure memory practices • Never persist secrets to disk/env
User Access Threats
User Access Threats
Server Threats
Server Threats
Client-Side Threats
Client-Side Threats

The Need for Multi-Layered Security

coco-arch

Relying solely on RBAC is insufficient. A defense-in-depth strategy combining strong authentication, network segmentation, least-privilege access, and runtime protection is essential.

However, all protections assume the control plane, worker nodes, and cluster admin are trusted. If the cluster-admin itself is compromised, RBAC and network policies fail.

This is where CoCo + KubeArmor integration provides immutable policies, runtime protection, and data-in-use protection inside hardware-backed enclaves.

Image 5Image 6

Integration Architecture

KubeArmor runs in systemd mode inside a Kata VM, ensuring policies are enforced directly within the confidential environment.

Key Components

  • Systemd Mode – Runs as a service in the Kata VM with immutable policies.
  • Embedded Policies – Bundled in the VM image, loaded at boot.
  • OCI Prestart Hook – Initializes KubeArmor before workload execution.
  • VM Image Preparation – KubeArmor binaries, configs, and units added to Kata VM image.

VM Image Preparation

Configuration Examples

kubearmor.path

[Unit]
Description=Monitor for /run/output.json and start kubearmor

[Path]
PathExists=/run/output.json
Unit=kubearmor.service

[Install]
WantedBy=multi-user.target

kubearmor.service

[Unit]
Description=KubeArmor

[Service]
User=root
KillMode=process
WorkingDirectory=/opt/kubearmor/
ExecStart=/opt/kubearmor/kubearmor /opt/kubearmor/kubearmor.yaml
Restart=always
RestartSec=10

[Install]
WantedBy=multi-user.target

Policy Enforcement Mechanisms

In the PoC, KubeArmor enforced fine-grained policies within the confidential container VM.

PoC Demo Summary

  • Blocked: raw sockets, writing to /bin
  • Allowed: unrestricted pod performed these actions successfully

✅ Validated runtime policy enforcement inside a confidential container.

Key Capabilities

  • Restrict execution of raw sockets
  • Block write operations to /bin, /usr/bin, /boot
  • Wildcard-based selectors for all containers in Kata VM

Policy Examples

Network Policy

apiVersion: security.kubearmor.com/v1
kind: KubeArmorPolicy
metadata:
name: net-raw-block
spec:
selector:
matchLabels:
kubearmor.io/container.name: ".*"
network:
matchProtocols:
- protocol: raw
action: Block

File Integrity Policy

apiVersion: security.kubearmor.com/v1
kind: KubeArmorPolicy
metadata:
name: file-integrity-monitoring
spec:
action: Block
file:
matchDirectories:
- dir: /bin/
readOnly: true
- dir: /sbin/
readOnly: true
selector:
matchLabels:
kubearmor.io/container.name: ".*"

Security Considerations

  • SPOF: If kubearmor.service stops, enforcement halts.
  • API Path Restrictions: Cannot block HTTP API paths yet.
  • PID-Specific Controls: No support for blocking stdout/stderr for specific PIDs.

Setup Guide: KubeArmor with Confidential Containers

Prerequisites

Kata Containers running in Kubernetes cluster.

1. Build an eBPF-Enabled Kata Kernel

git clone https://github.com/kata-containers/kata-containers.git
cd kata-containers/tools/packaging/kernel
./build-kernel.sh -v 6.4 setup
mv kata-linux-6.4-135/.config kata-linux-6.4-135/.config_backup
cp kata-config kata-linux-6.4-135/.config
./build-kernel.sh -v 6.4 build
sudo ./build-kernel.sh -v 6.4 install
sudo sed -i 's|^kernel =.*|kernel="/usr/share/kata-containers/vmlinux.container"|' \
/opt/kata/share/defaults/kata-containers/configuration-qemu.toml

2. Prepare Kata VM Image for KubeArmor

Place KubeArmor binaries under:

cloud-api-adaptor/podvm-mkosi/resources/binaries-tree/opt/kubearmor/

Structure:

BPF/
kubearmor
kubearmor.yaml
policies/
templates/

Example kubearmor.yaml:

k8s: false
useOCIHooks: true
hookPath: /run/output.json
enableKubeArmorStateAgent: true
enableKubeArmorPolicy: true
visibility: process,network
defaultFilePosture: audit
defaultNetworkPosture: audit
defaultCapabilitiesPosture: audit
alertThrottling: true
maxAlertPerSec: 10
throttleSec: 30

3. Update Presets

File: 30-coco.preset

enable attestation-protocol-forwarder.service
enable attestation-agent.service
enable api-server-rest.path
enable confidential-data-hub.path
enable kata-agent.path
enable netns@.service
enable process-user-data.service
enable setup-nat-for-imds.service
enable kubearmor.path
enable gen-issue.service
enable image-env.service

4. Add Prestart Hook

Place kubearmor-hook under:

cloud-api-adaptor/podvm-mkosi/resources/binaries-tree/usr/share/oci/hooks/prestart

5. Place Policies

cloud-api-adaptor/podvm-mkosi/resources/binaries-tree/opt/kubearmor/policies

Example:

protect-env.yaml
host-net-raw-block.yaml
host-file-integrity-monitoring.yaml

6. Deploy & Test Policy Enforcement

apiVersion: security.kubearmor.com/v1
kind: KubeArmorPolicy
metadata:
name: block-mysql-data-access
spec:
selector:
matchLabels:
app: mysql
file:
matchDirectories:
- dir: /var/lib/mysql/
recursive: true
action: Block

Test:

kubectl exec -it [MYSQL_POD_NAME] -c mysql -- cat /var/lib/mysql/any-file
# Expected: Permission denied

Challenges and Future Improvements

  • Wildcard selectors fixed fragility of container-name-based policies
  • Need daemonless policy persistence to mitigate SPOF
  • Enhance support for dynamic policy updates via CoCo initdata
  • Path-based network and process output restrictions pending kata-agent integration
  • Validate on production CoCo/Kata environments
  • Protect against service termination attacks inside enclaves

Acknowledgements

This work was made possible through close collaboration with the Confidential Containers (CoCo) community. We thank all contributors and maintainers for their guidance, feedback, and support throughout the development and integration process.

· 3 min read
Rishabh Soni

cover

Why OCI Hooks Matter in Modern Cloud Workloads

What are OCI Hooks?

OCI (Open Container Initiative) hooks are standard, custom binaries that the container runtime executes at specific points in a container’s lifecycle.

Lifecycle of a Container with OCI Hooks

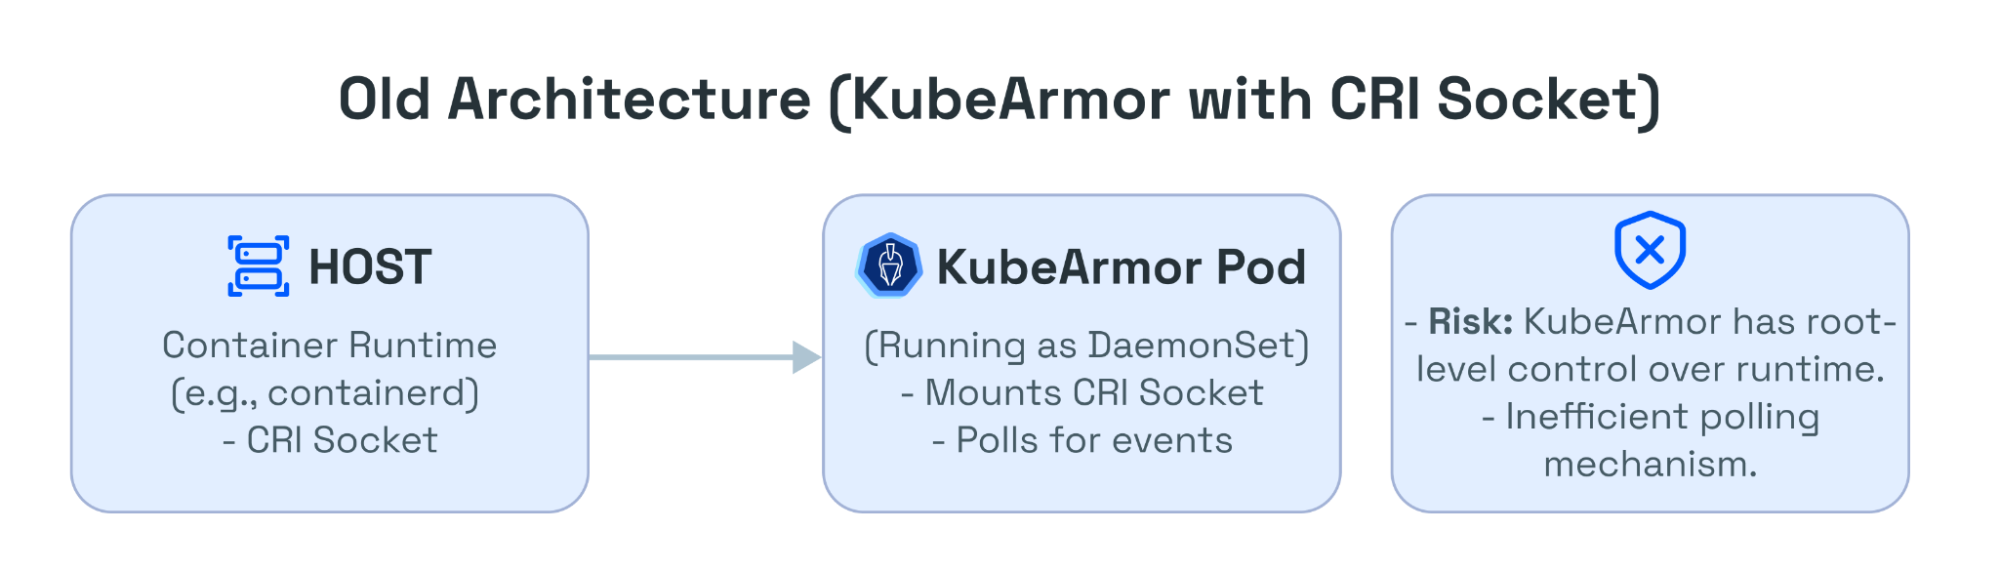
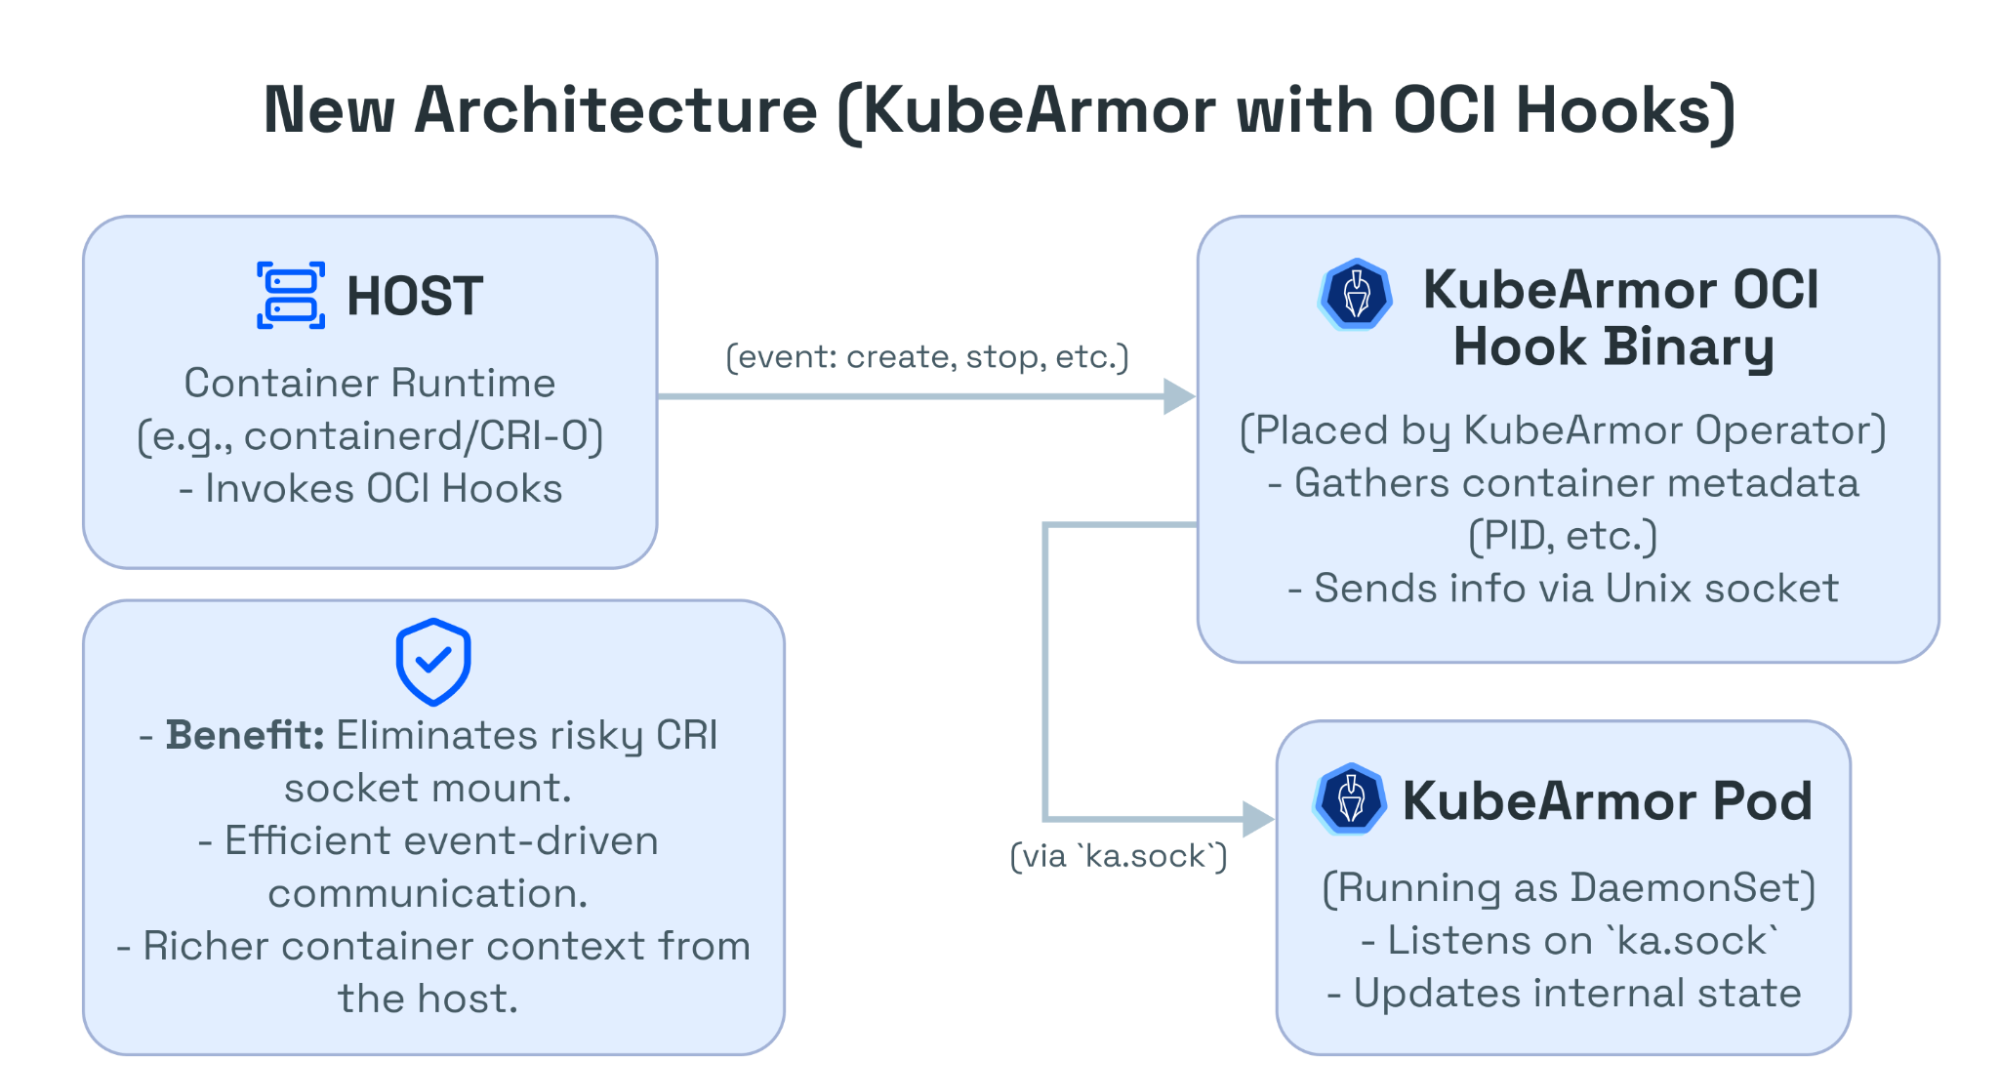
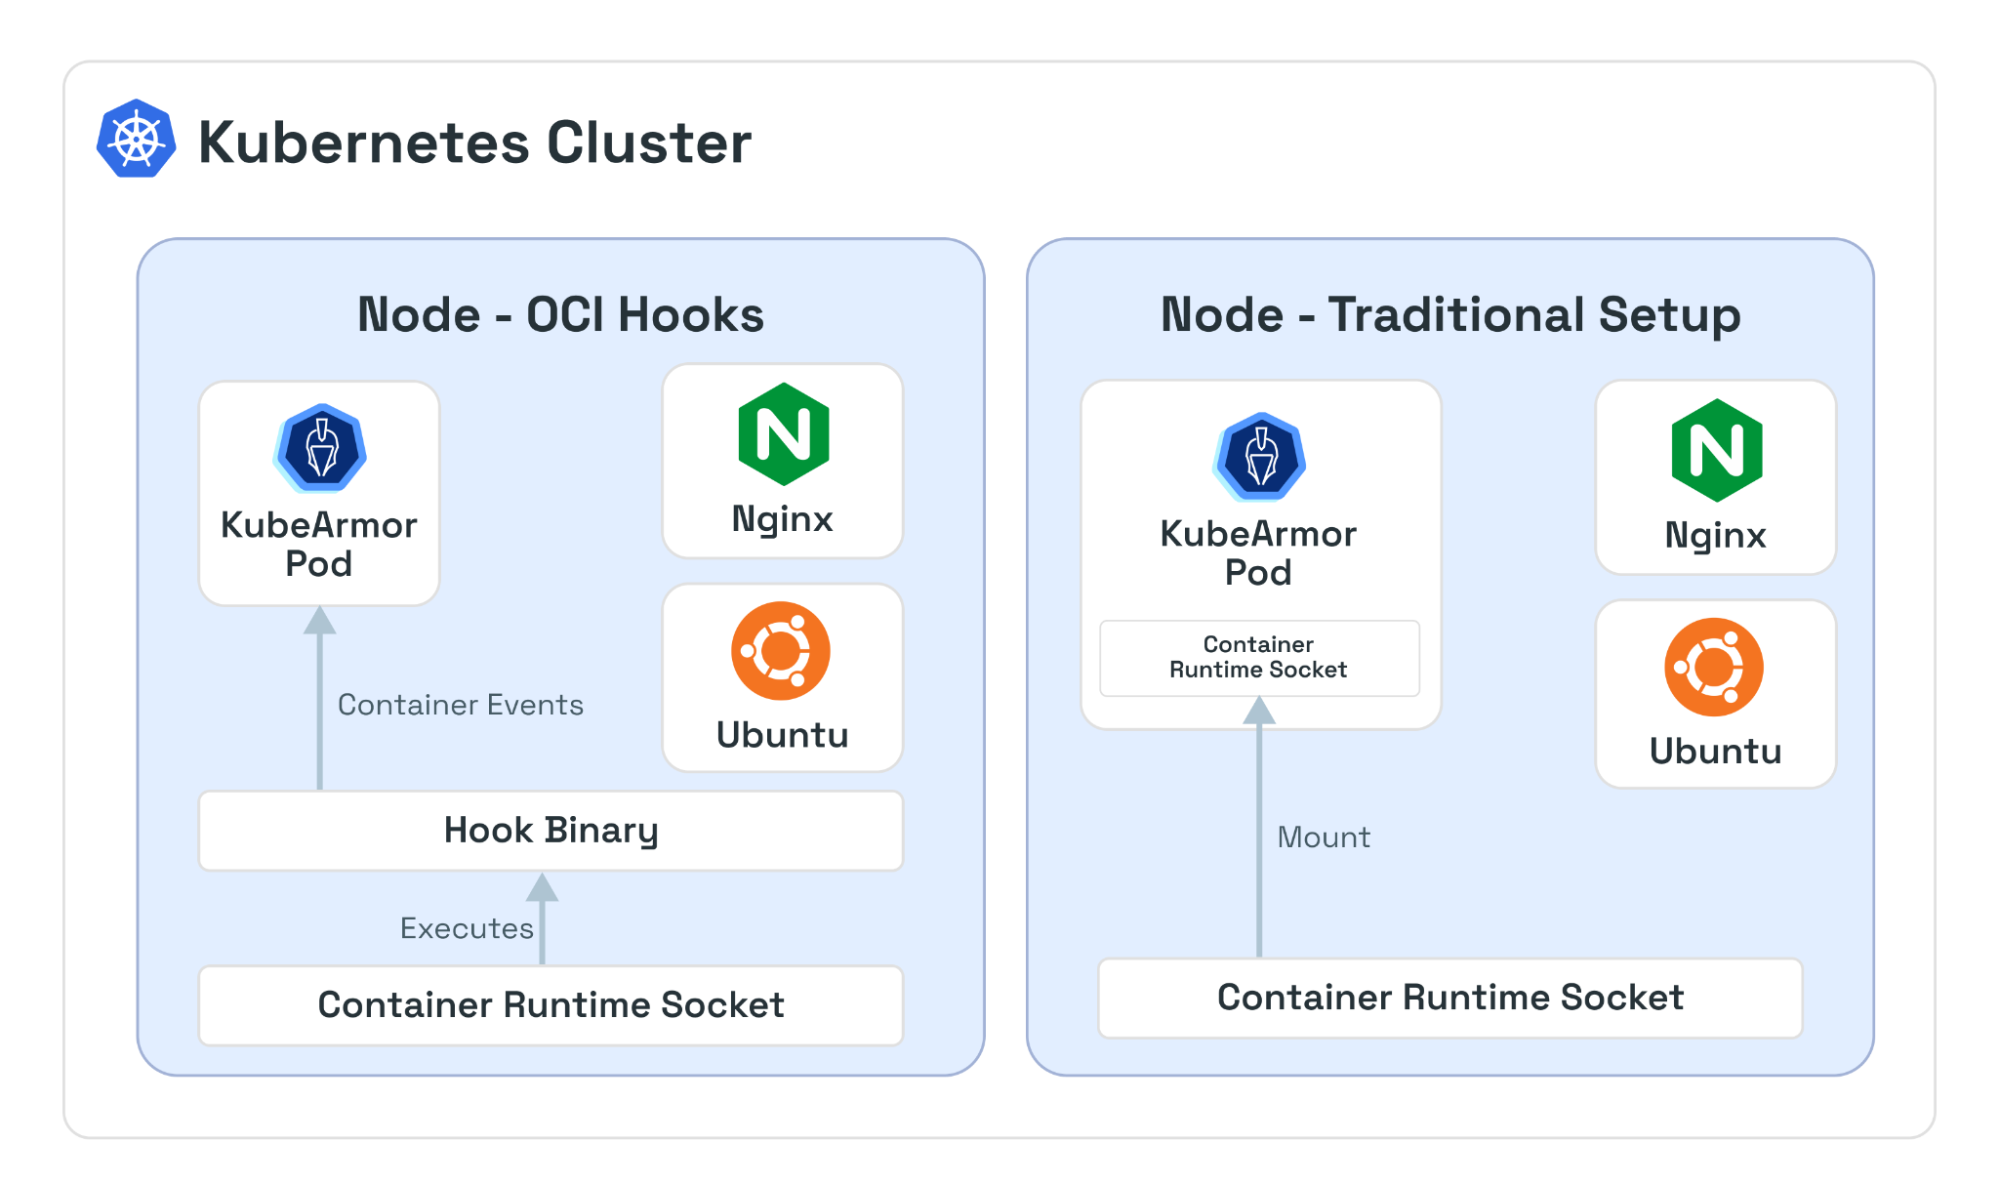
In practice, when a container runtime (like CRI-O or containerd) launches a container, it consults the OCI configuration (or NRI plugin) and executes any configured hooks at the appropriate stages.

  • Create runtime: After the runtime unpacks the container image and sets up namespaces, it runs the create runtime hook. For example, this could be used to register the container with monitoring tools.

  • Poststop: When the container process exits, the poststop hook is run. For example, this function can log the shutdown or trigger cleanup.

The OCI spec mandates hooks be executed in order, and the container’s state is passed via stdin, allowing the hook to identify the container (by ID, metadata, etc.).

⚠️ Note: A hook execution failure can abort container creation.

Why KubeArmor Introduced OCI Hooks Support

Before OCI hooks, KubeArmor obtained container events by mounting the container runtime’s Unix socket inside its pod and polling it.

  • This has serious security drawbacks:
    • Access to the CRI socket allows creating/deleting containers
    • Breaks container isolation
    • Is considered a security flaw

OCI hooks eliminate this dependency by giving KubeArmor event-driven access to container lifecycle data—securely.

old-arch new-arch

How KubeArmor Integrates with OCI Hooks

  • KubeArmor is typically deployed as a DaemonSet on each node.
  • It uses eBPF programs attached to LSM hooks (AppArmor/SELinux) to monitor syscalls.
  • For OCI hook support:
    • A hook binary is placed on the host by the KubeArmor Operator.
    • Its path is configured in the runtime’s hook JSON.
    • On a container lifecycle event, the runtime invokes the hook binary.
    • This binary collects container info (PID, namespace IDs, AppArmor profile) from /proc.
    • It sends the info to the KubeArmor daemon over a Unix socket (ka.sock).
    • KubeArmor then registers/unregisters the container in real time.

✅ All without mounting or polling any CRI runtime socket.

block-diagram

Use Cases Enabled by OCI Hooks

  • Eliminate Socket Privileges: No need for privileged access to CRI sockets → drastically improved security.

  • Richer Context: Hook runs on host → accesses container configuration directly (AppArmor/SELinux, namespaces, image layers).

  • Broader Environment Coverage: Works even in environments where CRI sockets aren’t accessible (as long as OCI hooks are supported).

Roadmap: What’s Next for OCI Hooks in KubeArmor

OCI hooks support is currently experimental. Future plans include:

  • Auto Deploy NRI Injector

    • Automate deployment via KubeArmor Operator
    • Eliminate manual installation of NRI on every node
  • Broader Runtime Support

    • Add Podman support using OCI hooks
    • Use hooks as a default integration pattern for new runtimes

References & Resources